Neon Aura & Jelly Nails: Summer’s Boldest Trends
Share
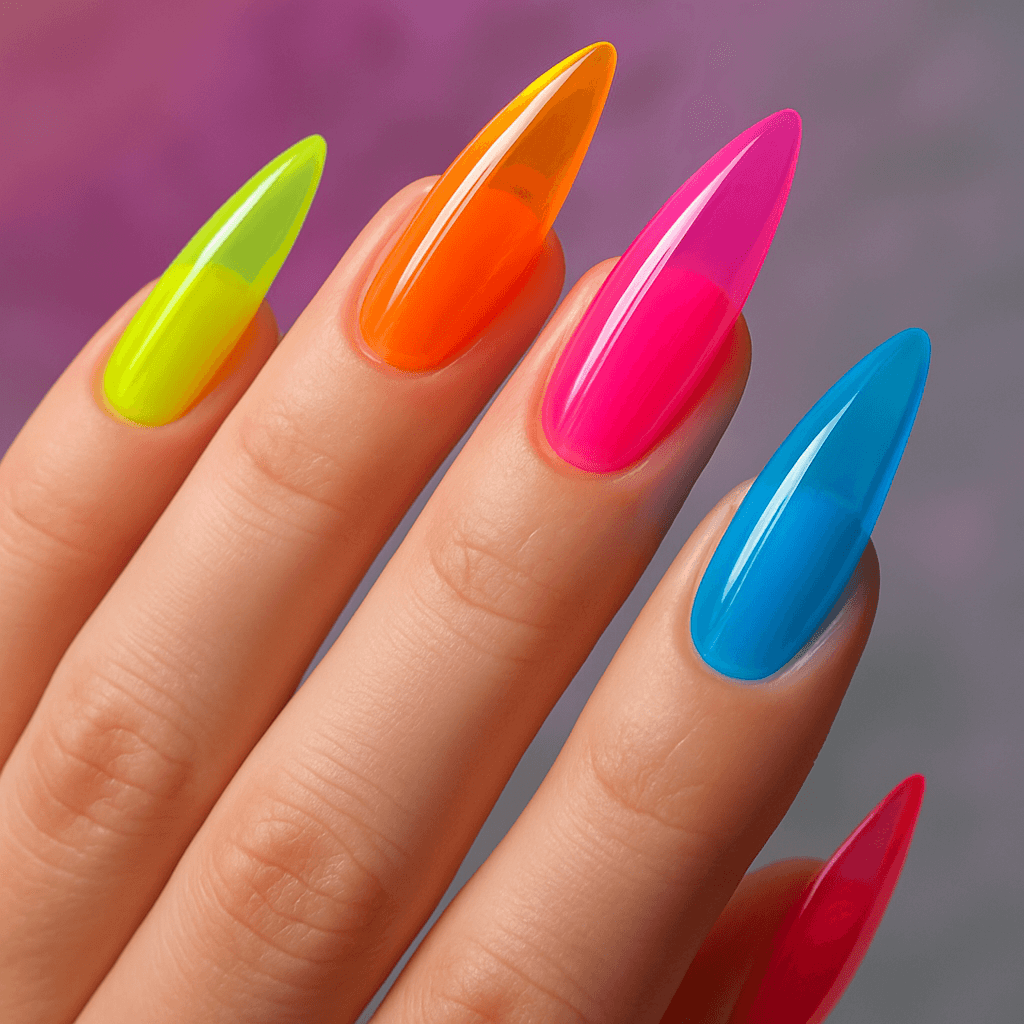
How to Create Jelly Nails: Step-by-Step Guide to Juicy, Translucent Tips 💅✨
Jelly nails—those glassy, candy-like nails that are sheer, vibrant, and oh-so-glossy—are one of the hottest trends in nail art. Whether you're going for neon brights, fruity shades, or a subtle tint, this style delivers fun, youthful vibes with every swipe.
Here's how to get that perfect jelly nail look, whether you’re using jelly nail polish or mixing your own. Let’s dive in!
🛍️ What You’ll Need:
-
Jelly nail polish (or clear polish + regular polish if DIY-ing)
-
Base coat
-
Top coat
-
UV/LED lamp (for gel jelly nails)
-
Nail file and buffer
-
Cuticle oil (optional but recommended)
💧 Step 1: Prep Your Nails
Start with clean, shaped nails. Gently push back your cuticles and file your nails to your desired shape. Use a buffer to smooth the surface and remove shine.
➡️ Pro Tip: Jelly nails look best on rounded or almond-shaped tips!
🧴 Step 2: Apply Base Coat
Always apply a base coat to protect your natural nails and help the jelly polish adhere better. Let it dry completely (or cure under a lamp if using gel).
🍬 Step 3: Apply Your Jelly Color
Option A: Using a Jelly Nail Polish
These are sheer, tinted formulas made just for this look. Apply 1–3 coats depending on how bold you want the color. Let each coat dry or cure in between.
Option B: DIY Jelly Polish
No jelly polish? No problem! Mix a few drops of your favorite regular polish with a clear polish to create a jelly-like formula. Mix well and apply in thin coats.
➡️ Color Ideas: Cherry red, lemon yellow, grape purple, ocean blue, or lime green are super on-trend!
✨ Step 4: Glazed & Glossy: Jelly Nails with Aura Powder
Take your jelly nails to the next level with eye-catching accents:
-
Aura powder for a soft, glowing center
-
Holographic powder for a futuristic, rainbow sheen
-
Glitter flakes for sparkle and dimension
-
Iridescent foil for a shimmery, glassy effect
-
Mini fruit or butterfly decals for a cute, summer vibe 🍓🦋
💡 Tip: Layer these under your final top coat to keep the design sealed and smooth.
💎 Step 5: Finish with Top Coat
Seal your look with a super-glossy top coat to enhance that “glass” effect. Cure or dry completely.
🌟 Aftercare Tips:
-
Use cuticle oil daily to keep nails hydrated.
-
Avoid harsh chemicals to maintain shine.
-
Reapply top coat every few days for long-lasting wear.
📸 Capture Your Look
Jelly nails are made for the 'gram! Snap your fresh mani in natural light to highlight their juicy shine.
Ready to create your own jelly nail masterpiece?
Shop sNails Nails and get everything you need—from base to top coat, plus fruity shades you’ll love.
#JellyNails, #AuraNails, #GlassNails, #GlowNails, #HolographicNails, #SheerNails, #NailArt, #NailTrends, #DreamyNails, #GlazedNails, #TranslucentNails, #NailInspo, #AuraPowder, #DIYNails, #EtherealNails.